by Ema Hevey
Whether on the mat or on the Reformer Half Roll Backs (or Supported Roll Backs) It is a great exercise to use as a warm up to wake up those lower abdominals and as a prequel to the Roll Up, however, if done incorrectly you may find yourself kicking into Hip Flexors and perhaps even lower back so it’s important that the movement be performed efficiently.
This exercise trains the rectus abdominis and the transverse abdominis – the upper and lower abs all in the same movement. As you slowly roll your spine back and forth, you focus on your breathing which helps to pull your abdominal muscles in and avoids relying on momentum to move.
Take the time to get to know this exercise and you will find that it has multiple uses as an awareness training tool, as well as an ab workout.
Half Roll Backs Step by Step
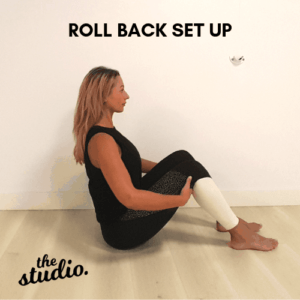
Step 1 – The Set Up
Before you begin your roll back, remember that this is a scoop exercise, not a collapsing movement. It is a lift and pull back of the abdominal muscles, with a corresponding lengthening curve of the spine as you roll back off the sit bones.
- Begin sitting upright on your sit bones. The legs are parallel with the knees bent and the feet flat on the floor (or flexed = deeper engagement through the backs of the legs which which enables connection from heels to sit bones- uncomfortable for some).
- Place your hands on your thighs just above the back of the knee.
- Engage your pelvic floor and abdominal muscles so that the upper body is easily supported. The shoulders are dropped, and the neck is relaxed.
- Take a minute to breathe fully, focusing on length up and down the spine.
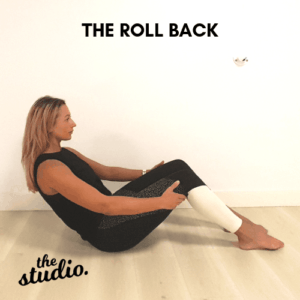
Step 2 – The Roll back
- Exhale as you pull the lower abdominals in deeply to initiate the move. Start very low, just above your pubic bone. Let your back expand and create an “up and over” curve in response. Keep the chest open and shoulders down.
- Keep your curve as you drop back and maintain a deep pull in of the abdominal area. Use the support of the hands to keep yourself using your abs, and do not allow the back or neck to get overly involved. Notice where different parts of the abs engage.
- Go as far back as you can go smoothly. If your abs start to shake (which is OK), or your neck gets tense, back off a bit.
- Hold for an inhale
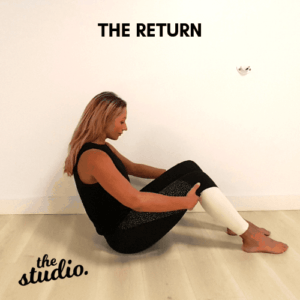
Step 3 – The Return
- Exhale as you initiate the return to upright with the lower abs.
- Keep your C Curve until you are up on your sit bones again, then send the tailbone down to the floor as you allow the spine to unfurl toward the sky, shoulders dropping.
Make sure you keep an eye on….
- Hunching shoulders (Keep shoulders from ears)
- Feet lifting (keep flat or flexed)
- Knees falling out to the side (keep parallel)
- Arching/extending through the spine rather than flexing (scooping)
- Using momentum (slow controlled movement)
- Holding the breath (the breath cycles are used to assist with the movement)
- Going too low (only required to go as far as abdominal connection is found and challenged
Ready for a challenge? Here are some top tips to take your roll backs up a notch
- Change your arm position
- Arms reach forward of the chest
- Genie Arms
- Hands behind the head
- Increase the range of roll back slightly
- Hold for an extended breath cycle
Need to back it off? Here are a few ways to modify your roll backs
- Hip flexor strain
- First try lessening the range of roll back
- Enforce the scoop and activation of lower abdominals
- Take feet a little further away from sit bones to relieve tension slightly (deeper knee flexion = more pressure on hips)
- Pilates ball between the knees can assist sometimes
- Lower Back strain
- First try lessening the range
- Enforce the scoop and activation of lower abdominals
- Pilates ball behind the tailbone as an assist
Now you’ve got all the info you need to roll back like a pro. Looking forward to seeing your perfected roll back in class!


